
DIY Golf Simulator: Wall & Ceiling Protection
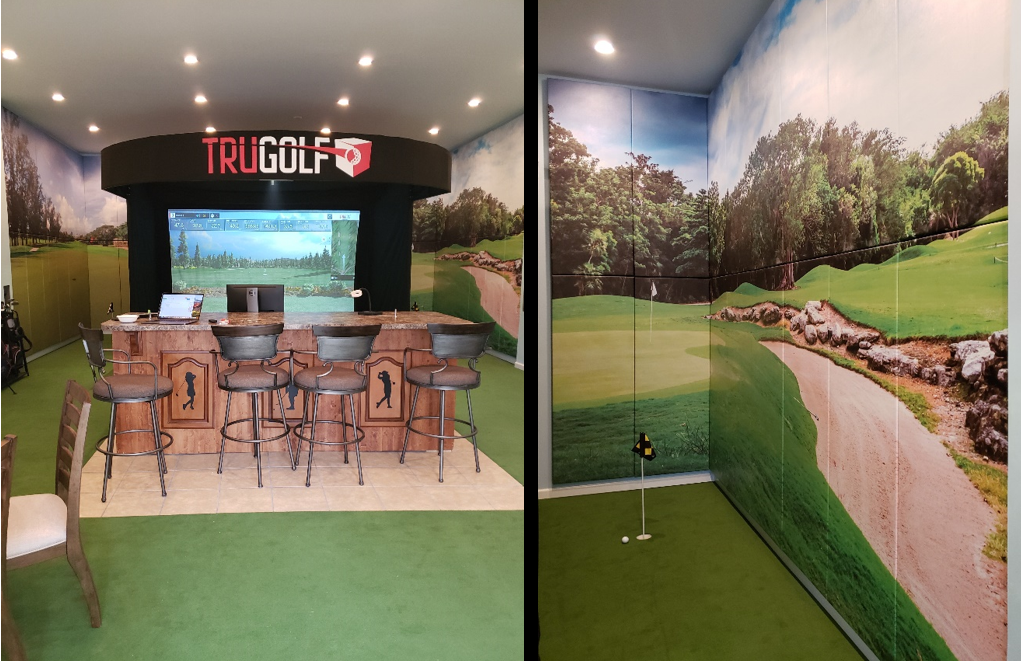
Every golfer knows the tight feeling of your first swing after a long winter. Golf simulators and virtual golf allow players to play all winter long, perfect golf swings, and be fitted for a custom set of clubs. Simulator systems require safety padding on the walls and ceiling to prevent stray balls from bouncing back and injuring someone. AK Athletics wall safety padding can be tailored to help utilize the available space of any room. Our wall padding is used for golf simulators at retail stores, sports pubs, and man caves.
Often many players prefer hitting actual golf balls versus plastic or foam balls to help stimulate the authentic feel when out on a golf course. AK Athletic Equipments pads have been proven to take the impact from real golf balls. Reducing the risk of the ball injuring someone if the ball has been shanked, bounced off the screen, wall, or ceiling. If a golf simulator has a curtain or netting to stop the golf ball, we recommend padding the wall behind to protect your wall and the safety of others.

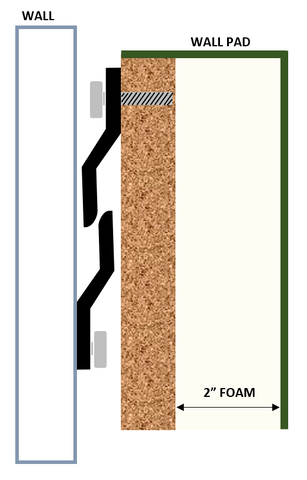
When padding an indoor golf simulator area, it is best to pad the whole wall, from the floor to ceiling and the entire ceiling. AK Athletics manufactures wall pads up to 8’ tall. Often customers will have to hang multiple rows of wall pads sitting flushed together. The best style of wall padding for golf simulators is wood back with z-clip attachment. The standard custom wall safety panel has a 1 inch lip to screw into the wall. When installing pads with the 1 inch lip at the top and bottom, there is a gap exposing 2 inches of hardwood.
When hanging protective pads on the ceiling, we typically recommend using z-clips. If the ceiling structure does not support wood back wall pads, an alternative is a fabric fastening strip around the perimeter of AK Athletics Easy Stick Wall Pads.
If you are looking for wall pads to be tailored to fit your room dimensions, check out our DIY project guide. A member of our sales team will work with you on creating a perfect fit and which pad to install first.
Please call in for pricing structure 800-431-4372
You can install professional wall padding with a few simple tools
Step 1. Familiarize yourself with z-clips
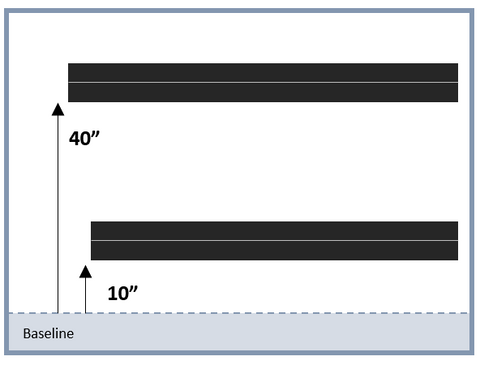
Each wall z-clip will have an identical mate to attach to the pad. When fastening the clip, it is essential to have the clip facing in the correct direction to provide maximum support. In the diagram below, you will see the bold black z-clip on the wall pointing up and the clip for the pad pointing down to hang on the corresponding z clip. The curved end on the z-clip is a great indicator to establish the correct direction. Also, the curved ends assist in attaching and removing panels. When the clips glide into one another, it should overlap one inch.
Step 2. Create a baseline
Installing the golf simulator wall pads slightly above the ground (around 1”) will enhance the overall professional look by reducing wrinkles that may appear. On the walls needing protective padding, create your baseline representing the bottom of wall safety padding. We found it best to use a chalk line to snap a horizontal line that runs parallel to the ground. Use a level to determine if your chalk line is accurate; avoid any up or downsloping.
With the same method for the baseline, create an additional line representing the height of wall padding.
Within the two chalk lines hang two z-clips onto the wall, a section towards the top and the other near the bottom.
Starting at the baseline, measure on up to the bottom of each z-clip.
Step 3. Install z-clips
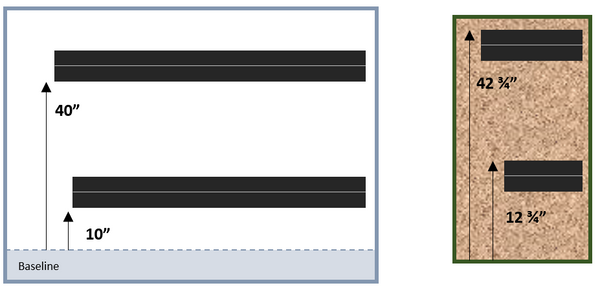
To attach the z clip to the wall safety panel, lay the pad flat backside facing up.
With a permanent marker, indicate the location for the top of the z clip by measuring from the bottom of the safety wall panel up to the base of the wall z clip and add 2 ¾”. With ⅜” screws, attach the clip into the pad. Repeat the previous step for the bottom set of z-clips attachment. Continue your way down the wall once you complete the first row being the next row.
If you find yourself needing additional golf simulator equipment or prefer to work with a professional golf simulator company, check out Premium Golf Simulators.
Next →
← Previous


